Hãy tham gia diễn đàn 361dodesign ngay hôm nay và hãy đăng ký thành viên để có thể xem hiển thị hết diễn đàn + links download + và chia sẻ kinh nghiệm..v..v..!!!!!!!!!!!!!!!!!!!!!!
Chúc các bạn một ngày vui vẻ..
0o -.......Forum 361dodesign.com.......- o0
Hãy tham gia diễn đàn 361dodesign ngay hôm nay và hãy đăng ký thành viên để có thể xem hiển thị hết diễn đàn + links download + và chia sẻ kinh nghiệm..v..v..!!!!!!!!!!!!!!!!!!!!!!
Chúc các bạn một ngày vui vẻ..
0o -.......Forum 361dodesign.com.......- o0
Bạn có muốn phản ứng với tin nhắn này? Vui lòng đăng ký diễn đàn trong một vài cú nhấp chuột hoặc đăng nhập để tiếp tục.
0o -.......Forum 361dodesign.com.......- o0
Dịch vụ Thiết kế - In ấn - In Offset - Thế giới Thiết kế - Download phần mềm - Download Vector Free - Hỗ trợ Forum
Mobile : 0916166006 Tổng số bài gửi : 661 Điểm tích lũy : 6798 Thích : 9 Birthday : 03/01/1986 Tham gia : 17/09/2011 Tuổi : 38 Đến từ : Tuyen Quang Sở thích/Công việc : Designer Graphic Làm việc tại : Công ty TNHH TM và Phát triển Quảng Cáo 361° Design Châm ngôn sống : Trai TUYEN QUANG boc dau xe LIFAN
Tiêu đề: Lồng ghép Cinema 4D vào After Effects Wed Apr 11, 2012 10:12 am
Integrating Cinema 4D into After Effects
[youtube][/youtube] Step 1
I’m making this tutorial presuming that the reader has at least some basic knowledge of Cinema 4d so I won’t show you the details. Basicly, you should set up a scene like this. I used MoGraph Text Object with Start and End Fillet Cap’s enabled.
Step 2
Next, we’re going to set up lighting. Create Sky under Objects>Scene. This will serve as HDR light.
Create two new materials in Materials panel by File>New Material.
Save your work.
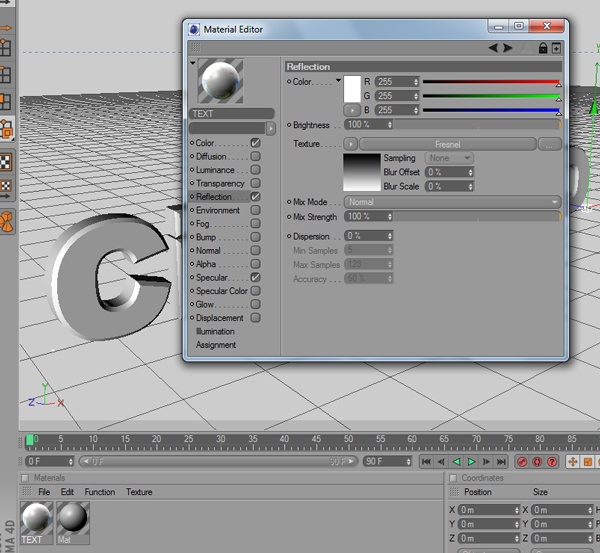
Step 3
First material will be for text object’s and the second one for skylight.
Open the first one and tick Reflection. Set its texture to Fresnel so it would reflect more around the edges and less in middle. Call the material TEXT.
Step 4
Now the second one. Call it SKY. Untick the Color‘s checkbox and enable Luminance. Set your HDR image as Texture.
Step 5
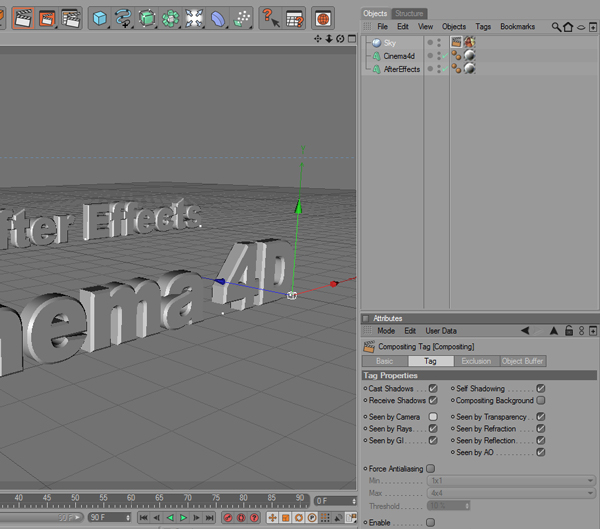
Now, attach those materials to the corresponding layers. You’ll see that the Sky light makes an ugly texture in background that we don’t need there. To resolve it, Right Click on Sky layer and choose Cinema 4D Tags>Compositing. After, click on that tag and under Tag Properties untick Seen by Camera.
Save.
Step 6
Next, you’ll have to make a new camera and animate it. When making Target Camera, don’t forget to go into its Depth options and untick Use Target Object and if necessary, change Target Distance.
To get more control over camera’s Depth of Field tick in Front Blur and Rear Blur in Depth panel. Change the view so you can see the camera in your viewport. Then start changing the End values for both Front and Rear Blur. As you change those values, you’ll notice changes in camera’s Field of View both in front and rear. Those dark green lines shows which where the blur will start and where it ends. Basicly, everything that’s between them will blur and vice versa.
See the screenshot.
Save.
Step 7
After you render a frame, you’ll see that everything doesn’t look very well. Go to Render>Render Settings. First, select Options and disable Auto Light, then go to Global Illum. and enable it. Set its type to Stochastic.
Save.
Step 8
Now I’ll show you how to render seperate alpha channels for both text objects and a depth map. First, you have to apply the Compositing Tag for both text layers (as in Step 5). Select one of them and open its Object Buffer tab, tick Enable. Do the same with other one except, after ticking Enable, change the Buffer value to 2.
Step 9
Open Render Settings.
First, highlight Antialiasing and select Best quality. Also change Filter to Animation.
Second, highlight Multi-Pass. In Channels pulldown, select Depth, Object Buffer with ID 1 and Object Buffer with ID 2. Change Path as you need.
Third, go to Output and change everything of your choice.
Finally, highlight Save and select a path for the main render. Enable Alpha Channel as well as Compositing Project File and 3D Data which are the most important for integration between Cinema 4D and After Effects. This will aslso export lights from Cinema to After Effects if you need one.
Save.
Now you can render your movie by going to Render>Render to Picture Viewer.
Note: If you decide that you want to render the image with Depth of Field inside Cinema4D, open Effects and add Depth of Field from Post Effects pulldown.
Step 10
Before you open After Effects, there’s one more issue to clear. Cinema 4D has generated an AEC file which essentialy is an After Effects composition but you can’t import it inside After Effects just yet.
You’ll have to open you Cinema 4D directory, then find Exchange Plugins folder and open aftereffects folder in it. After that, basing on your OS and AE version, copy the right folder to you After Effects plug-ins directory. For me it was pc 6.5 because I have PC and After Effects CS4.
Run After Effects.
Step 11
Once in After Effects, go to File>Import>File… and import that AEC file from your main render directory.
Open Cinema 4D Composition. This is how it should look.
Step 12
First, I’ll add background and a vignette. After that, I’ll bring in the exported depth map into composition and create a new Adjustment Layer under it. Call both layer Depth map and Depth Control accordingly and set Depth Control’s TrackMatte to Luma Matte.
Save.
Step 13
Apply Fast Blur to Depth Control and change Blurriness to 15. Tick Repeat Edge Pixels.
Save.
Step 14
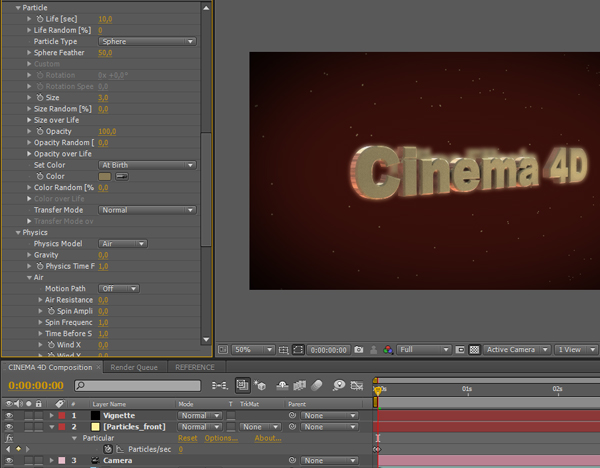
Next, you can start adding particles to the scene. Create a new solid and call it Particles_front. Apply Particular to it. To get the emitter in the centre, open Camera‘s transform options and see the values for Point of Interest. Then open Particular’s Emitter pulldown and change Position XY to the values of Point of Interest. In my case, they’re 189 for X and 0 for Y. If necessary, you can do it with Z value too but at the momoent we won’t do it.
Change Emitter Type to Box.
Save.
Step 15
Basically, the idea is to make three layers of particles – one in front, another one in middle and one in back.
As the layer name tells, this’ll be the first one.
Offset Particles_front layer in timeline so at frame 0, particles would be fully generated. Change Emitter Size X to 4000 and Y to 2000.
Lower all the Velocity values to 0. Also, change Particles/sec to 200.
Save.
Step 16
Go to Particle pulldown menu and change Life to 10 and Size to 3. Change Color to #887B58.
Lastly, open Physics>Air>Turbulence Field and change Affect Position to 100.
Now, to stop them from emitting, highlight Particles/sec and position timeline marker to fram 0. Add a new keyframe and offset Particles_front layer 1 frame so that the created keyframe would be at frame -1 in timeline. Next, go to frame 0 and add a keyframe with Particles/sec set to 0.
Step 17
Duplicate Particles_front and rename it to Particles_middle. Change Particular’s Position Z to 600. Also change Emitter Z to 320 for more depth.
You can see particles through Cinema 4D type. That’s why I rendered both alpha channels seperatly. Bring the alpha map for Cinema 4D inside the composition.
Create a black solid underneath this layer and set solid’s TrackMatte to Luma Matteso it would “cut out” the alpha.
Save.
Step 18
Precompose both layers and call the composition Cinema4d_Alpha. Place Cinema4d_Alpha above Particles_middle. Set particle layer’s TrackMatte to Alpha Inverted Matte. Now particles will be seen everywhere but on top of Cinema 4D type.
Save.
Step 19
Duplicate Particles_middle and call it Particles_back. Turn off its TrackMatte. Set particle emitter’s Position Z to 1100. Again, you need an alpha matte. Duplicate the layer with main animation, since it contains alpha channels of both types together, and place it above Particles_back.
Set Particles_backTrackMatte to Alpha Inverted.
Save.
Step 20
Now you’ll have to set up Depth of Field for particles. First, go through all the particle layers and change Render Mode toFull Render + DOF Square (AE).
Also, while going through, open Visibility pulldown for all three particle layers and change Far Vanish to 2200 and Far Start Fade to 1900 so there wouldn’t be so much particles in the scene.
Then open Camera‘s Camera Options. There, change Depth of Field to On. Set Focus Distance to 900 and Aperture to 85.
Step 21
Finally, create a new Adjustment Layer on top of every other layers and call it Colors. Apply Curves for contrast and Noise to it.